Storyline Quests: Difference between revisions
Wearetibia (talk | contribs) No edit summary |
Wearetibia (talk | contribs) (Add illustrated quest walkthrough: actual map views, numbered landmarks and floor-by-floor directions.) |
||
| (11 intermediate revisions by 2 users not shown) | |||
| Line 1: | Line 1: | ||
<div class="wad-illustrated-guide wad-dark" style="background:#101b26;color:#e1e9ef;padding:16px;box-sizing:border-box;max-width:100%;"> | |||
{{Player navigation}} | |||
<div style=" | |||
Story quests unlock new areas and rewards for your character. Follow the requirements of each route: some chapters form a chain, while others have their own entry requirements. | |||
<div style="border-left:5px solid #c0392b; padding:.7em 1em; margin:1em 0; background:#171b22;">'''Spoiler notice:''' this page reveals the order, regions and major rewards. Expand a route only when you want those details.</div> | |||
== Complete walkthroughs == | |||
Choose your current route. Each guide includes preparation, ordered steps, rewards and help when progress stops. The illustrated guides below add numbered maps and close-ups of important places. Click a map to enlarge it; its legend shows coordinates and the floor. | |||
<div style="overflow-x:auto;"> | |||
{| class="wikitable" style="width:100%;" | |||
! Guide !! What you will find | |||
|- | |- | ||
| [[Rorina Storyline|Rorina — all six chapters]] || Chapter objectives, four spiritual wands, boss gates and the route after Baphomet. | |||
|- | |- | ||
| | | [[Nivalis Quest|Nivalis — Ice Crystal to Devil Hills]] || Sacrifices, riddles, crystals, Lord Urjuke, Zepar and the route to Tarnstead. | ||
| | |- | ||
| | | [[Dragon Fall Storyline|Dragon Fall and Rivenstone]] || Regional story, rune seals, merchant missions, Grumpy Giant, Minorus and local challenges. | ||
| | |- | ||
| | | [[Dhurmon Quest|Dhurmon — complete investigation and western quest]] || Island access, Giorgio's murder, Urtrudurk souls and dolls, manifestations, energies and final rewards. [[Dhurmon Quest/Rituals|Exact ritual layouts and wall sequences]]. | ||
| | |- | ||
| [[Far East and Samurai Quest|Far East and Samurai — all eight seals]] || Rare List, Ronins, every Shogun seal, page and gem tasks, Kitsune, Yama Uba and Samurai Island access. | |||
|- | |||
| [[Viper Island Quest|Viper Island — complete illustrated walkthrough]] || The island's trials, access to Tarnstead and Covenant forge crafting. | |||
|- | |||
| [[Tentacle Quest|Tentacle — Tarnstead keys, underground and castle]] || All four Tarnstead keys, entrance switches, four personal throne powers, lava passage, castle trials, Black Skeleton Outfit and Tentacle Earrings. | |||
|} | |||
</div> | |||
== Illustrated route atlas == | |||
| style="width: | <div style="display:flex;flex-wrap:wrap;gap:16px;align-items:stretch;margin:16px 0;"> | ||
| style="width: | <div style="flex:1 1 320px;max-width:100%;min-width:0;box-sizing:border-box;padding:14px;background:#15202a;border:1px solid #43586b;border-radius:6px;">'''[[Far East and Samurai Quest|Far East / Samurai]]'''<br> | ||
<div style="max-width:100%;overflow:hidden;margin:10px 0;">[[File:WAD Guide far-east-palace.png|350px|link=Far East and Samurai Quest|alt=Far East / Samurai: numbered map preview]]</div> | |||
Find Shakiro and the Shogun, follow all eight seals, and locate the Kitsune and Yama Uba entrances.<br>[[Far East and Samurai Quest|Open the complete illustrated walkthrough →]]</div> | |||
<div style="flex:1 1 320px;max-width:100%;min-width:0;box-sizing:border-box;padding:14px;background:#15202a;border:1px solid #43586b;border-radius:6px;">'''[[Dhurmon Quest|Dhurmon]]'''<br> | |||
<div style="max-width:100%;overflow:hidden;margin:10px 0;">[[File:WAD Guide dhurmon-body.png|350px|link=Dhurmon Quest|alt=Dhurmon: numbered map preview]]</div> | |||
Find the investigation clues, prison passage, soul keepers and western quest. Separate maps cover the offering fields and energy walls.<br>[[Dhurmon Quest|Open the complete illustrated walkthrough →]]</div> | |||
<div style="flex:1 1 320px;max-width:100%;min-width:0;box-sizing:border-box;padding:14px;background:#15202a;border:1px solid #43586b;border-radius:6px;">'''[[Rorina Storyline|Rorina]]'''<br> | |||
<div style="max-width:100%;overflow:hidden;margin:10px 0;">[[File:WAD Guide rorina-castle.png|350px|link=Rorina Storyline|alt=Rorina: numbered map preview]]</div> | |||
Follow all six chapters with maps of the quest rooms, rewards, personal thrones and spiritual-wand locations.<br>[[Rorina Storyline|Open the complete illustrated walkthrough →]]</div> | |||
<div style="flex:1 1 320px;max-width:100%;min-width:0;box-sizing:border-box;padding:14px;background:#15202a;border:1px solid #43586b;border-radius:6px;">'''[[Nivalis Quest|Nivalis]]'''<br> | |||
<div style="max-width:100%;overflow:hidden;margin:10px 0;">[[File:WAD Guide nivalis-fire-pillars.png|350px|link=Nivalis Quest|alt=Nivalis: numbered map preview]]</div> | |||
Locate the sacrifice tiles, arrange the fire offerings and find the crystal-key room, Urjuke and the next route.<br>[[Nivalis Quest|Open the complete illustrated walkthrough →]]</div> | |||
<div style="flex:1 1 320px;max-width:100%;min-width:0;box-sizing:border-box;padding:14px;background:#15202a;border:1px solid #43586b;border-radius:6px;">'''[[Dragon Fall Storyline|Dragon Fall / Rivenstone]]'''<br> | |||
<div style="max-width:100%;overflow:hidden;margin:10px 0;">[[File:WAD Guide dragonfall-prison-offering.png|350px|link=Dragon Fall Storyline|alt=Dragon Fall / Rivenstone: numbered map preview]]</div> | |||
Find the regional contacts, rune seals, prison altar and labyrinth rewards, with the correct floor for each landmark.<br>[[Dragon Fall Storyline|Open the complete illustrated walkthrough →]]</div> | |||
<div style="flex:1 1 320px;max-width:100%;min-width:0;box-sizing:border-box;padding:14px;background:#15202a;border:1px solid #43586b;border-radius:6px;">'''[[Tentacle Quest|Tentacle / Tarnstead]]'''<br> | |||
<div style="max-width:100%;overflow:hidden;margin:10px 0;">[[File:WAD Guide tentacle-castle-levers.png|350px|link=Tentacle Quest|alt=Tentacle castle: numbered switches and entrance]]</div> | |||
Collect the four Tarnstead keys, explore the underground throne branches and complete the Tentacle castle for the outfit and earrings.<br>[[Tentacle Quest|Open the complete illustrated walkthrough →]]</div> | |||
</div> | |||
== Rorina storyline == | |||
<div class="mw-collapsible" style="border:1px solid #5b6573; padding:.7em; margin:.7em 0;"> | |||
'''Expand the six-chapter route''' | |||
<div class="mw-collapsible-content"> | |||
<div style="overflow-x:auto;"> | |||
{| class="wikitable" style="width:100%;" | |||
! Order !! Chapter !! Preparation !! Region !! Major progress / reward | |||
|- | |- | ||
| | | 1 || [[Rorina part 1 Quest Spoiler|Rorina Part 1]] || Start of the chain; level 15 is relevant to the additional reward selection. || South of Thais || Glimmering Crystal and an early equipment reward choice. | ||
| | |||
| | |||
| | |||
|- | |- | ||
| | | 2 || [[Rorina part 2 Quest Spoiler|Rorina Part 2]] || Complete Part 1; level 60. || Darashia || Mysterious Red Gem, equipment choice and access to Part 3. | ||
| | |||
| | |||
| | |||
|- | |- | ||
| | | 3 || [[Rorina part 3 Quest Spoiler|Rorina Part 3]] || Complete the earlier chapters; level 90. || Fibula || Key 25602 and reward chests; collect the Mysterious Green Gem later in Rorina castle. | ||
| | |||
| | |||
| | |||
|- | |- | ||
| | | 4 || [[Rorina part 4 Quest Spoiler|Rorina Part 4]] || Complete the earlier chapters; level 100. || Ankrahmun || Demonic Bracelet, Mysterious Violet Gem and a Demonic armor-piece choice. | ||
| | |||
| | |||
| | |||
|- | |- | ||
| | | 5 || [[Rorina part 5 Quest Spoiler|Rorina Part 5]] || Complete the earlier chapters and all three personal Farina thrones. || Heavenium Island || One Heavenly weapon choice plus other reward chests; the full Godly Set is a separate boss-route chest. | ||
| | |||
| | |||
| | |||
|- | |- | ||
| | | 6 || [[Rorina part 6|Rorina Part 6]] || Level 150 and Dragon Key 25610 (75 Golden Tokens); four thrones inside. Its entrance does not require Parts 1–5. || Plains of Havoc || Ultimate Bloody Gem, pet equipment and a Bloody weapon choice. Completion opens the next storyline route. | ||
| | |} | ||
| | </div> | ||
| | </div></div> | ||
After Part 6, travel to Heavenia and speak with '''Serina''' about the Baphomet Soul. The storyline then leads toward Zepar and Lord Urjuke. | |||
== Crystal, Zepar and Reaper route == | |||
<div class="mw-collapsible" style="border:1px solid #5b6573; padding:.7em; margin:.7em 0;"> | |||
'''Expand the post-Rorina route''' | |||
<div class="mw-collapsible-content"> | |||
<div style="overflow-x:auto;"> | |||
{| class="wikitable" style="width:100%;" | |||
! Order !! Quest !! Requirement / start !! Region !! Unlock | |||
|- | |- | ||
| | | 1 || [[Ice Crystal Quest]] || Begin the Crystal route and obtain the Ice Crystal. || Nivalis route || Nivalis boat access and the route to the Fire Crystal mission. | ||
| | |||
| | |||
| | |||
|- | |- | ||
| | | 2 || [[Fire Crystal Quest]] || Complete the Ice Crystal mission. || Crystal storyline route || Access to Lord Urjuke's area and the next story dialogue. | ||
| | |||
| | |||
| | |||
|- | |- | ||
| | | 3 || [[Zepar quest|Zepar Quest]] || Complete Zepar's trials; Lord Urjuke's request is also needed to receive the Magical Crystal. The trials can be completed first. || Catacombs beneath Demona || Magical Crystal and continuation of the main story. | ||
| | |||
| | |||
| | |||
|- | |- | ||
| | | 4 || [[Devil Hills Scroll Quest]] || Follow the post-Zepar directions. || Nivalis / Devil Hills route || Required progress for the Reaper Prisoner route. | ||
| | |||
| | |||
| | |||
|- | |- | ||
| | | 5 || [[Reaper Prisoner Quest]] || Complete the earlier Crystal, Zepar and Devil Hills steps. || Havenium, Warlock Palace || Reaper Cape and a Reaper weapon choice. | ||
| | |- | ||
| | | 6 || [[Reaper Quest]] || Level 200 and the preceding Reaper route. || Havenium, Warlock Palace || Separate illustrated Reaper content. Lord Urjuke's documented mission chain ends with Antemist Research and the Reaper Cape. | ||
| | |||
| | |||
| | |||
|} | |} | ||
</div> | |||
</div></div> | |||
== Dhurmon branch == | |||
[[Betray Urtrudurks]] is a regional storyline branch. It requires [[Access to Dhurmon]] and unlocks the western side of Dhurmon. | |||
== Helpful checks == | |||
* Use the [https://map.wearedragons.info/ Map Viewer] to locate NPCs and entrances by name. | |||
* If an NPC does not continue the dialogue, revisit the previous linked chapter and confirm that its final interaction was completed. | |||
* Quest keys and story items should be kept until the full chain is finished. | |||
[[Category:Quests]] | |||
[[Category:Guides]] | |||
</div> | |||
Latest revision as of 01:52, 15 October 2026
| WIKI HOME systems and tools |
DOWNLOAD official client files |
GETTING STARTED first steps and progression |
| ABOUT SERVER core features and vocations |
COMMANDS verified player commands |
DUNGEONS requirements and difficulty |
| SPELLS vocations and incantations |
RUNES names and requirements |
LEARNED SPELLS unlocks and effects |
| AUTO LOOT lists, targets and limits |
QUESTS story and access routes |
BOSSES world, daily and instanced |
| MARKET & AUCTIONS offers, item auctions and character auctions | ||
Story quests unlock new areas and rewards for your character. Follow the requirements of each route: some chapters form a chain, while others have their own entry requirements.
Complete walkthroughs
Choose your current route. Each guide includes preparation, ordered steps, rewards and help when progress stops. The illustrated guides below add numbered maps and close-ups of important places. Click a map to enlarge it; its legend shows coordinates and the floor.
| Guide | What you will find |
|---|---|
| Rorina — all six chapters | Chapter objectives, four spiritual wands, boss gates and the route after Baphomet. |
| Nivalis — Ice Crystal to Devil Hills | Sacrifices, riddles, crystals, Lord Urjuke, Zepar and the route to Tarnstead. |
| Dragon Fall and Rivenstone | Regional story, rune seals, merchant missions, Grumpy Giant, Minorus and local challenges. |
| Dhurmon — complete investigation and western quest | Island access, Giorgio's murder, Urtrudurk souls and dolls, manifestations, energies and final rewards. Exact ritual layouts and wall sequences. |
| Far East and Samurai — all eight seals | Rare List, Ronins, every Shogun seal, page and gem tasks, Kitsune, Yama Uba and Samurai Island access. |
| Viper Island — complete illustrated walkthrough | The island's trials, access to Tarnstead and Covenant forge crafting. |
| Tentacle — Tarnstead keys, underground and castle | All four Tarnstead keys, entrance switches, four personal throne powers, lava passage, castle trials, Black Skeleton Outfit and Tentacle Earrings. |
Illustrated route atlas
Find Shakiro and the Shogun, follow all eight seals, and locate the Kitsune and Yama Uba entrances.
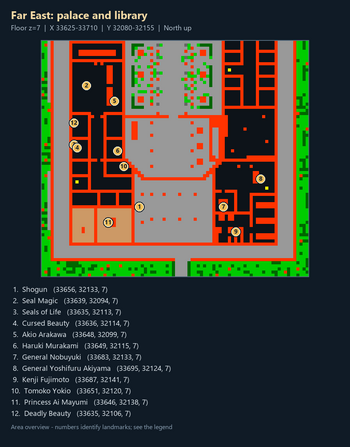
Open the complete illustrated walkthrough →
Find the investigation clues, prison passage, soul keepers and western quest. Separate maps cover the offering fields and energy walls.
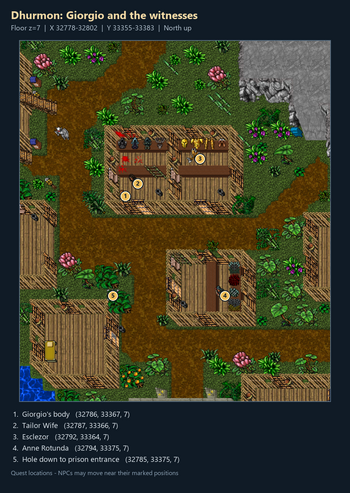
Open the complete illustrated walkthrough →
Follow all six chapters with maps of the quest rooms, rewards, personal thrones and spiritual-wand locations.
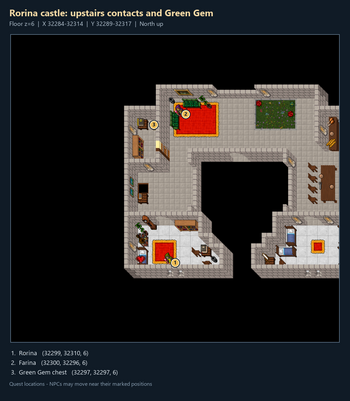
Open the complete illustrated walkthrough →
Locate the sacrifice tiles, arrange the fire offerings and find the crystal-key room, Urjuke and the next route.
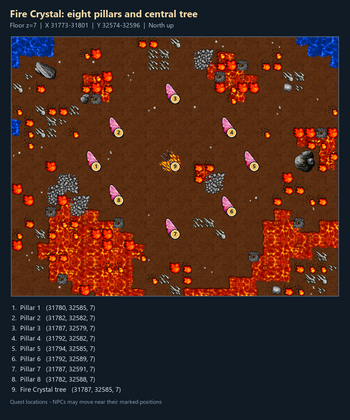
Open the complete illustrated walkthrough →
Find the regional contacts, rune seals, prison altar and labyrinth rewards, with the correct floor for each landmark.
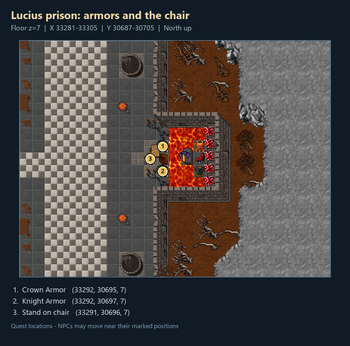
Open the complete illustrated walkthrough →
Collect the four Tarnstead keys, explore the underground throne branches and complete the Tentacle castle for the outfit and earrings.
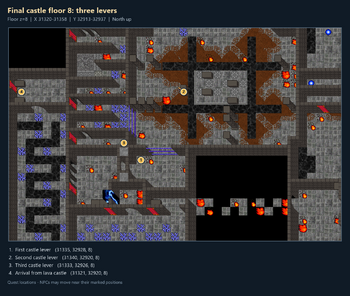
Open the complete illustrated walkthrough →
Rorina storyline
Expand the six-chapter route
| Order | Chapter | Preparation | Region | Major progress / reward |
|---|---|---|---|---|
| 1 | Rorina Part 1 | Start of the chain; level 15 is relevant to the additional reward selection. | South of Thais | Glimmering Crystal and an early equipment reward choice. |
| 2 | Rorina Part 2 | Complete Part 1; level 60. | Darashia | Mysterious Red Gem, equipment choice and access to Part 3. |
| 3 | Rorina Part 3 | Complete the earlier chapters; level 90. | Fibula | Key 25602 and reward chests; collect the Mysterious Green Gem later in Rorina castle. |
| 4 | Rorina Part 4 | Complete the earlier chapters; level 100. | Ankrahmun | Demonic Bracelet, Mysterious Violet Gem and a Demonic armor-piece choice. |
| 5 | Rorina Part 5 | Complete the earlier chapters and all three personal Farina thrones. | Heavenium Island | One Heavenly weapon choice plus other reward chests; the full Godly Set is a separate boss-route chest. |
| 6 | Rorina Part 6 | Level 150 and Dragon Key 25610 (75 Golden Tokens); four thrones inside. Its entrance does not require Parts 1–5. | Plains of Havoc | Ultimate Bloody Gem, pet equipment and a Bloody weapon choice. Completion opens the next storyline route. |
After Part 6, travel to Heavenia and speak with Serina about the Baphomet Soul. The storyline then leads toward Zepar and Lord Urjuke.
Crystal, Zepar and Reaper route
Expand the post-Rorina route
| Order | Quest | Requirement / start | Region | Unlock |
|---|---|---|---|---|
| 1 | Ice Crystal Quest | Begin the Crystal route and obtain the Ice Crystal. | Nivalis route | Nivalis boat access and the route to the Fire Crystal mission. |
| 2 | Fire Crystal Quest | Complete the Ice Crystal mission. | Crystal storyline route | Access to Lord Urjuke's area and the next story dialogue. |
| 3 | Zepar Quest | Complete Zepar's trials; Lord Urjuke's request is also needed to receive the Magical Crystal. The trials can be completed first. | Catacombs beneath Demona | Magical Crystal and continuation of the main story. |
| 4 | Devil Hills Scroll Quest | Follow the post-Zepar directions. | Nivalis / Devil Hills route | Required progress for the Reaper Prisoner route. |
| 5 | Reaper Prisoner Quest | Complete the earlier Crystal, Zepar and Devil Hills steps. | Havenium, Warlock Palace | Reaper Cape and a Reaper weapon choice. |
| 6 | Reaper Quest | Level 200 and the preceding Reaper route. | Havenium, Warlock Palace | Separate illustrated Reaper content. Lord Urjuke's documented mission chain ends with Antemist Research and the Reaper Cape. |
Dhurmon branch
Betray Urtrudurks is a regional storyline branch. It requires Access to Dhurmon and unlocks the western side of Dhurmon.
Helpful checks
- Use the Map Viewer to locate NPCs and entrances by name.
- If an NPC does not continue the dialogue, revisit the previous linked chapter and confirm that its final interaction was completed.
- Quest keys and story items should be kept until the full chain is finished.