Tarnstead Tentacles: Difference between revisions
Wearetibia (talk | contribs) |
Wearetibia (talk | contribs) |
||
| Line 31: | Line 31: | ||
== Quest Walkthrough == | == Quest Walkthrough == | ||
=== Part 1 – | === Part 1 – Devilspawn palace key === | ||
| Line 55: | Line 55: | ||
If you have not yet completed this challenge, you must defeat the Immortal God before proceeding beyond this point. | If you have not yet completed this challenge, you must defeat the Immortal God before proceeding beyond this point. | ||
=== Part 2 – | === Part 2 – Welcome to Tarnstead === | ||
[[File:2025-10-20 00-21-54.png|center|thumb|1221x1221px]] | |||
fter boarding the boat in eastern Nivalis and speaking with the boat captain Admiral Rolfe, you will arrive at Tarnstead. | |||
From here, follow the path markers indicated in the reference images: | |||
'''* Mark 1 leads to the Death Order area.''' | |||
'''* Mark 2 directs you to the first part of the Tarnstead tutorial, where you will begin collecting the keys required for full access.''' | |||
Proceed carefully through the designated paths and prepare for upcoming challenges within the Tarnstead region. | |||
=== Part 3 – First Tarnstead Key Location === | |||
[[File:2025-10-20 00-30-48.png|center|thumb|612x612px]] | |||
To obtain the first key, follow the red arrows shown in the reference images — starting from Picture Mark 1 and continuing to Picture Mark 2. | |||
Exercise caution while traveling through Tarnstead. The Dark slayers and Dark Hunters in this area inflict extremely high damage and can overwhelm unprepared players. | |||
'''''<u>Tip: Use Might Rings, Elven Amulets, and Skull Auraorbs to reduce incoming damage and increase survivability.</u>''''' | |||
Once you reach the final arrow marker, climb up the nearby hill and interact with the dead tree to obtain the first key. | |||
[[File:2025-10-20 00-36-23.png|center|thumb]] | |||
---- | |||
=== Part 4 – Second Tarnstead Key Location === | |||
After obtaining the first key, descend the hill and follow the red arrows shown in the '''first image''', heading '''east''' toward the locked door. Use the key you collected earlier to unlock it and proceed inside. | |||
Climb two levels up using the ladders until you reach the area shown in '''Picture 2'''. From there, open the '''western''' door and descend the next ladder. | |||
Continue following the red line in the images until you reach the marked zone. Go down the final ladder to enter the lower chamber. | |||
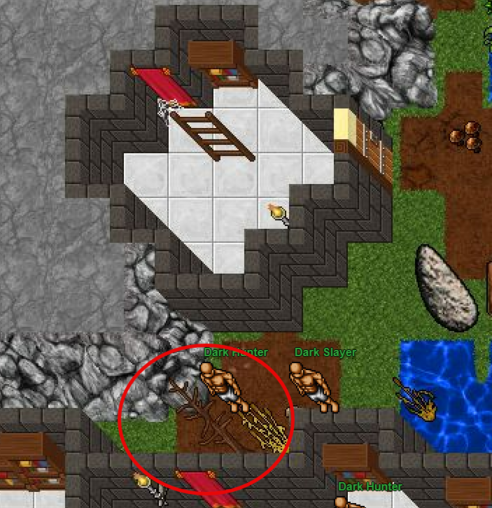
You will now find yourself at the location of the second key. Interact with the '''dead tree''' to obtain it and continue your progress through the Tarnstead access route. | |||
[[File:2025-10-20 00-39-14.png|left|thumb|635x635px]] | |||
[[File:2025-10-20 00-40-01.png|center|thumb|520x520px]] | |||
[[File:2025-10-20 00-40-24.png|center|thumb|700x700px]] | |||
[[File:2025-10-20 00-41-23.png|center|thumb|508x508px]] | |||
---- | |||
Revision as of 22:53, 19 October 2025
Tarnstead Tentacles Access
Requirements
- One immortal god kill
- Devilspawn palace key
Rewards
- Access to tarnstead
- Tarnstead castle keys
- Access to tentacle earring quest
Location
- Tarnstead
Enemies
Monsters
- Dark slayers
- Dark hunters
- Devilspawns
Bosses
- No bosses
Quest Walkthrough
Part 1 – Devilspawn palace key
Begin your journey by traveling to the Devilspawn Palace.
Your objective in this part is to obtain the key required to unlock access to the Tarnstead boat.
Follow the reference images provided:
* Mark 1 indicates your starting location.
* Mark 2 marks the spot where the key can be found.
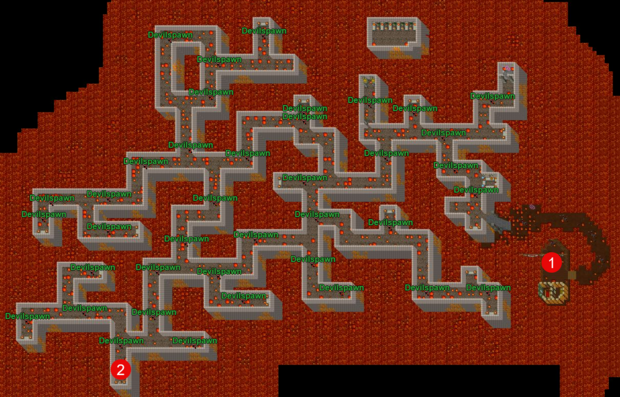
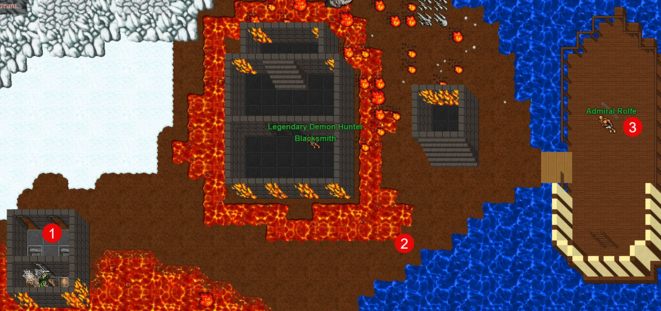
After obtaining the key from the Devilspawn Palace, make your way to Nivalis, where Lord Urjuke resides.
From Lord Urjuke’s location, head up the stairs and then travel east toward the dock that leads to the Tarnstead boat.
Important note:
At the area marked as “Mark 2,” access to the boat is restricted unless you have defeated the Immortal God — the Monster Point Boss.
If you have not yet completed this challenge, you must defeat the Immortal God before proceeding beyond this point.
Part 2 – Welcome to Tarnstead
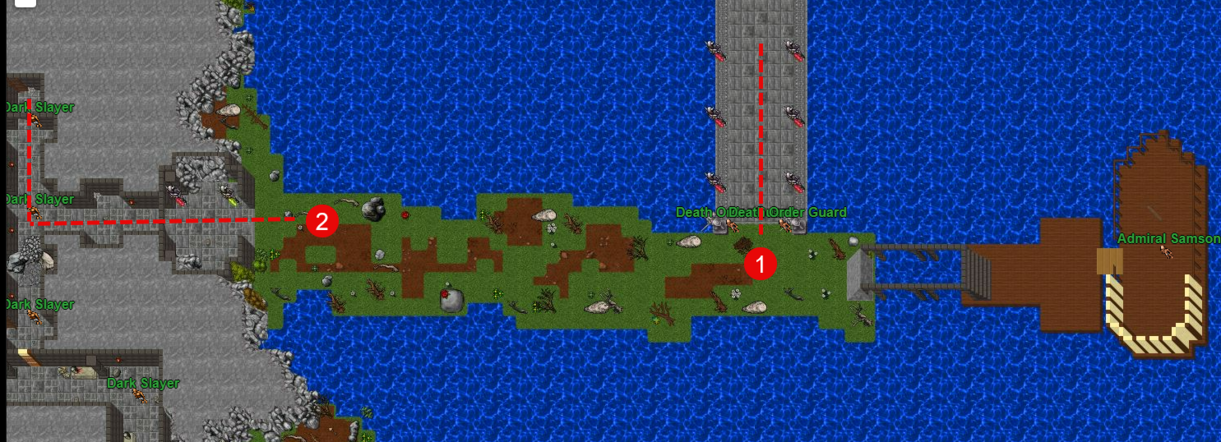
fter boarding the boat in eastern Nivalis and speaking with the boat captain Admiral Rolfe, you will arrive at Tarnstead.
From here, follow the path markers indicated in the reference images:
* Mark 1 leads to the Death Order area.
* Mark 2 directs you to the first part of the Tarnstead tutorial, where you will begin collecting the keys required for full access.
Proceed carefully through the designated paths and prepare for upcoming challenges within the Tarnstead region.
Part 3 – First Tarnstead Key Location
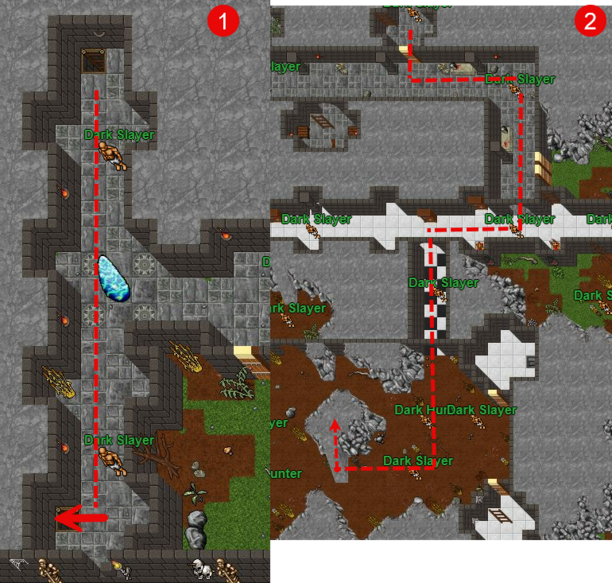
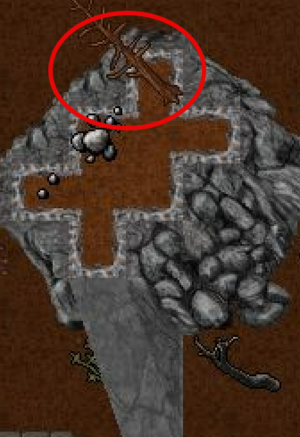
To obtain the first key, follow the red arrows shown in the reference images — starting from Picture Mark 1 and continuing to Picture Mark 2.
Exercise caution while traveling through Tarnstead. The Dark slayers and Dark Hunters in this area inflict extremely high damage and can overwhelm unprepared players.
Tip: Use Might Rings, Elven Amulets, and Skull Auraorbs to reduce incoming damage and increase survivability.
Once you reach the final arrow marker, climb up the nearby hill and interact with the dead tree to obtain the first key.
Part 4 – Second Tarnstead Key Location
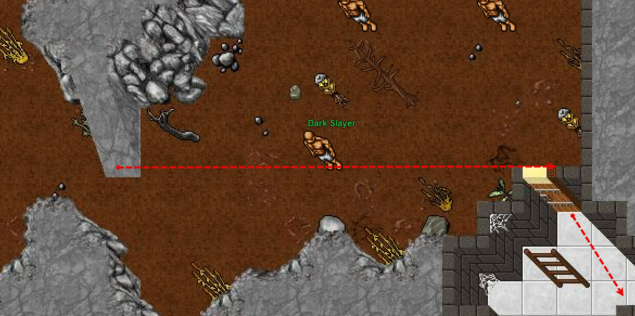
After obtaining the first key, descend the hill and follow the red arrows shown in the first image, heading east toward the locked door. Use the key you collected earlier to unlock it and proceed inside.
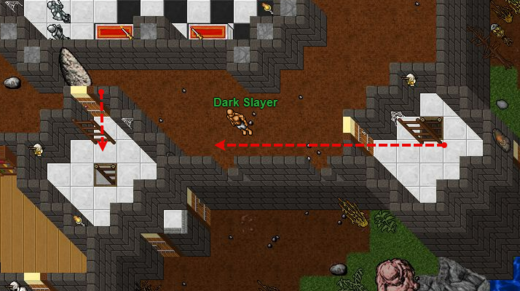
Climb two levels up using the ladders until you reach the area shown in Picture 2. From there, open the western door and descend the next ladder.
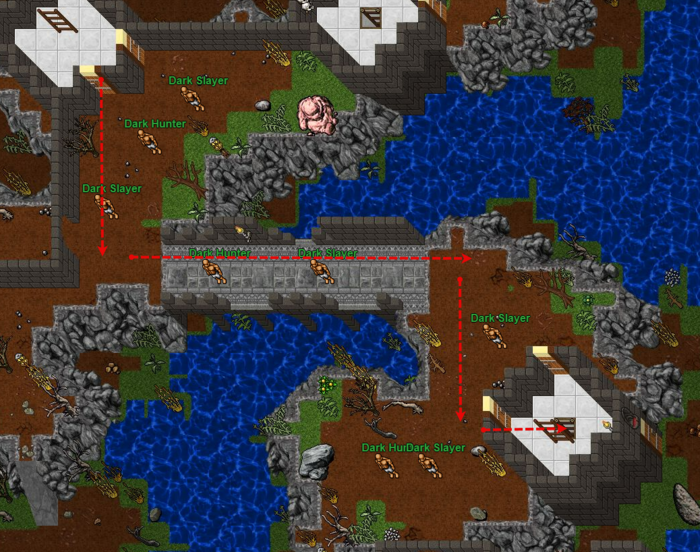
Continue following the red line in the images until you reach the marked zone. Go down the final ladder to enter the lower chamber.
You will now find yourself at the location of the second key. Interact with the dead tree to obtain it and continue your progress through the Tarnstead access route.
Quest Complete
You now have access to Tarnstead Tentacles. This access unlocks new areas and questlines tied to Tarnstead exploration.
Tips
- Add strategic notes or recommendations here.
