Rorina part 6: Difference between revisions
(Created page with " = Method = *Go to POH, go through the Dark Cathedral and find the place marked on the map. Upon arriving, go down the stairs; *Be prepared to face Demons Skeletons and Bloo...") |
Wearetibia (talk | contribs) |
||
| (3 intermediate revisions by the same user not shown) | |||
| Line 1: | Line 1: | ||
= Rorina Quest – Part 6 = | |||
= | == Rewards == | ||
* '''Devil Paperdoll Outfit Scroll''' (+150 HP, +130 MP, +1 Magic Level, +5 Skills) | |||
* '''Reborn Scroll''' (+200 Reborn Points) | |||
* '''Ultimate Bloody Gem''' (+1.75% lifesteal) | |||
* '''One item of your choice:''' | |||
** Bloody Sword | |||
** Bloody Axe | |||
** Bloody Hammer | |||
** Bloody Wand | |||
** Black Demon Shield | |||
** Bloody Crossbow | |||
---- | |||
== Requirements == | |||
* Level 150 or higher | |||
* No previous Rorina parts required | |||
* Pick | |||
* Rope | |||
* 1× Destroy Field Rune | |||
---- | |||
== Locations == | |||
* Dragon Fall | |||
* Plains of Havoc (PoH) | |||
---- | |||
== Enemies == | |||
'''Monsters''' | |||
* Bloody Spider, Fury, Tibia Explorer, Skull Demon, Demon Father, Prisoned Sinner, Bloody Mage, Sleepy Hollow, Grand Warlock | |||
* | '''Bosses''' | ||
* Andras | |||
* Baphomet (Final Boss) | |||
* Dantalion | |||
* Forneus | |||
* Halphas | |||
---- | |||
== Quest Walkthrough == | |||
[[File:2025-10-11 00-09-35.png|center|thumb|569x569px]] | |||
=== Part 1 – Purchase the Dragon Key === | |||
Travel to Dragon Fall and locate the building with the NPC '''Ancient Traveler'''. | |||
* Climb upstairs and purchase the '''Dragon Key (25610)''' by right-clicking the lever beside it. | |||
* Cost: 75 Golden Tokens. | |||
---- | |||
[[File:2025-10-11 00-10-03.png|center|thumb|612x612px]] | |||
=== Part 2 – Entering the Quest Area (PoH) === | |||
1. From '''Venore''', run to the '''Plains of Havoc'''; the target area is '''south of the Dark Cathedral'''. | |||
2. At spot '''(1)''' on your map, jump down the small hole; run south and rope up into an area swarming with Bloody Spiders. | |||
[[File:2025-10-11 00-10-11.png|center|thumb|612x612px]] | |||
3. Continue south to a small building with stairs '''down (2)'''; descend. | |||
4. In the Fury cave, move to the skull formation at the '''center'''; use a Pick to break it and jump down. | |||
[[File:2025-10-11 00-10-22.png|center|thumb|702x702px]] | |||
[[File: | 5. In the next floor, go '''southeast''' and take the stairs down; then go '''northwest''' and jump the next hole. | ||
6. Follow the indicated path to a guarded building: | |||
[[File:2025-10-11 00-10-44.png|left|thumb|481x481px]] | |||
[[File:2025-10-11 00-11-07.png|center|thumb|797x797px]] | |||
'''Entry requires Level 150+ Inside, use the Dragon Key (25610) on the locked door and take the blue teleport''' | |||
* | Now you must collect **three keys** from chests to unlock the main quest zone. | ||
[[File: | '''Key Collection''' | ||
* Go to spot '''(1)''': a sewer hole under a '''fire field'''. Use your <u>'''''Destroy Field Rune'''''</u>, jump down, and loot '''Key (25612)''' from the chest. | |||
* Return and open the door at spot '''(2)''' with Key '''(25612).''' | |||
* Loot '''Key (25613)''' at '''spot (3)''' and '''Key (25614)''' at spot '''(4)'''. | |||
* Proceed to '''spot (5)''' and take the stairs down to reach the Main Quest Location. | |||
* Use '''Keys (25613)''' and '''(25614)''' on the doors to enter. | |||
* The nearby '''blue teleport''' is an exit that returns you to the pre-door room (where you used the Dragon Key). | |||
[[File:2025-10-11 00-37-38.png|left|thumb|640x640px]] | |||
[[File: | [[File:2025-10-11 00-37-47.png|center|thumb|524x524px]] | ||
---- | |||
=== Part 3 – The Four Sigils (Boss Thrones) === | |||
Your objective is to activate the four thrones by visiting each trial via the '''four blue portals'''. | |||
Order does not matter. Killing each boss spawns a return portal, but is not strictly required to progress. | |||
'''Note:''' '''<u>''These bosses have a small chance to drop a Sapphire Amulet,godly earrings,pyromancer earrings which is used in later content — it is recommended to defeat them.''</u>''' | |||
; Andras | |||
: Follow the marked route to '''Andras'''. Step on the '''<u>''throne''</u>''' in his arena. | |||
: Area mobs: Skull Demons. | |||
[[File:2025-10-11 00-37-58.png|center|thumb|615x615px]] | |||
; Forneus | |||
: Follow the route to '''Forneus'''. Step on the '''''throne''''' | |||
: Area mobs: Prisoned Sinners, Soul Hunters, Bloody Mages. | |||
[[File:2025-10-11 00-38-15.png|center|thumb|707x707px]] | |||
; Dantalion | |||
: Follow the route to '''Dantalion'''. Step on the '''throne'''. | |||
: Area mobs: Demon Fathers. | |||
[[File:2025-10-11 00-38-39.png|center|thumb|697x697px]] | |||
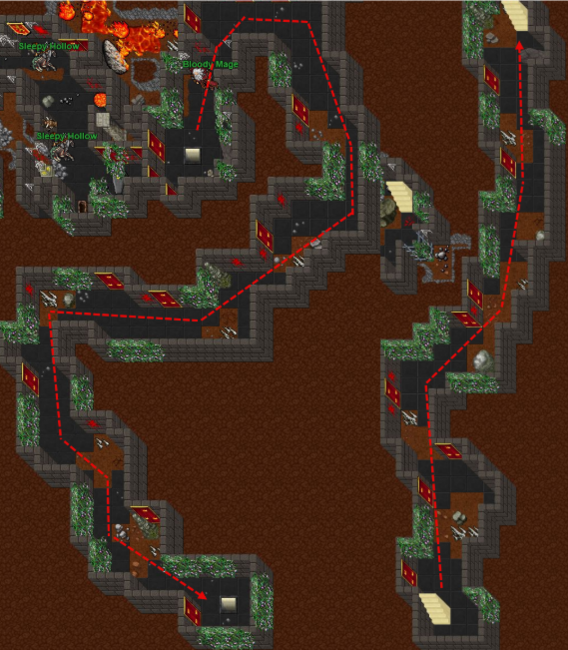
; Halphas | |||
: Follow the route to '''Halphas'''. Step on the '''throne'''. | |||
: Area mobs: Sleepy Hollows, Bloody Mages. | |||
[[File:2025-10-11 00-38-55.png|left|thumb|595x595px]] | |||
[[File:2025-10-11 00-39-03.png|center|thumb|650x650px]] | |||
'''After activating all four thrones, the path to the final encounter opens.''' | |||
---- | |||
=== Part 4 – Final Boss: Baphomet === | |||
1. Go upstairs via the staircase just north of the hub. | |||
[[File:2025-10-11 02-38-48.png|center|thumb]] | |||
& | 2. Follow the red-marked path, pass the door, and take the teleport in that room. | ||
[[File:2025-10-11 02-38-56.png|center|thumb|754x754px]] | |||
[[File:Image222.png|center|thumb|424x424px]] | |||
3. After teleporting, move **west**, then follow the path '''north''' to a new blue portal; enter to reach the '''Baphomet''' arena (boss room is at the **upper** section). | |||
'''Mechanics & Tips''' | |||
* '''Baphomet summons Bloody Mages near himself. Using fire Bomb runes around the boss can prevent their spawns.''' | |||
* '''Applies multiple curses: slow, reduced healing, reduced mana healing.''' | |||
* '''Recommended: a Druid using <code>exura sio</code> on a tank or strong lifesteal gear.''' | |||
On victory, a '''blue portal''' appears at the top of the room between two statues. | |||
OBS: <u>'''''Before leaving, loot the Blue Spiritual Wand from Baphomet’s corpse – it is required for the next storyline quest (Zepar chain).'''''</u> | |||
---- | |||
=== Part 5 – Reward Room === | |||
Enter the portal to the Reward Room. | |||
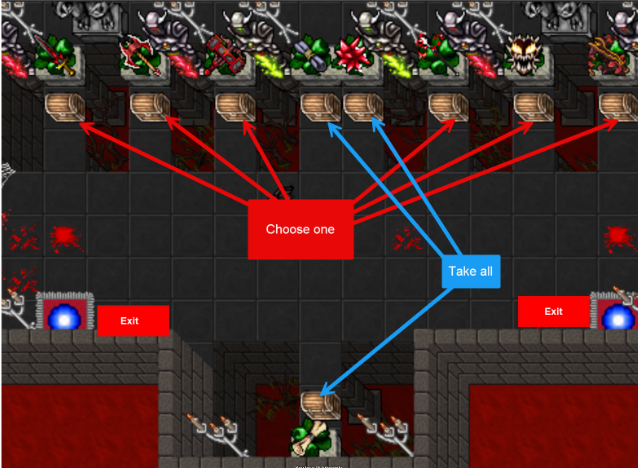
* Claim all rewards and exit via one of the teleports, or use a '''Teleport Crystal''' (store item) to leave. | |||
* Exit portals return you to the start of the Main Quest Area. | |||
[[File:Image12356.png|center|thumb|638x638px]] | |||
---- | |||
== Quest Complete == | |||
You have completed '''Rorina Quest – Part 6'''. | |||
The Rorina line concludes here, but the story continues with the '''Zepar''' quest chain — first step: [[Zepar part 1]]. | |||
---- | |||
''Tips'' | |||
* Bring a Destroy Field Rune, Pick, and ample Fire Bomb runes for add control. | |||
* High burst and cleanse support mitigate Baphomet’s healing/mana-healing debuffs. | |||
* Sapphire Amulet, pyromancer earrings and godly earrings drops are rare — consider farming the four trial bosses if you plan for future content. | |||
Latest revision as of 00:43, 11 October 2025
Rorina Quest – Part 6
Rewards
- Devil Paperdoll Outfit Scroll (+150 HP, +130 MP, +1 Magic Level, +5 Skills)
- Reborn Scroll (+200 Reborn Points)
- Ultimate Bloody Gem (+1.75% lifesteal)
- One item of your choice:
- Bloody Sword
- Bloody Axe
- Bloody Hammer
- Bloody Wand
- Black Demon Shield
- Bloody Crossbow
Requirements
- Level 150 or higher
- No previous Rorina parts required
- Pick
- Rope
- 1× Destroy Field Rune
Locations
- Dragon Fall
- Plains of Havoc (PoH)
Enemies
Monsters
- Bloody Spider, Fury, Tibia Explorer, Skull Demon, Demon Father, Prisoned Sinner, Bloody Mage, Sleepy Hollow, Grand Warlock
Bosses
- Andras
- Baphomet (Final Boss)
- Dantalion
- Forneus
- Halphas
Quest Walkthrough
Part 1 – Purchase the Dragon Key
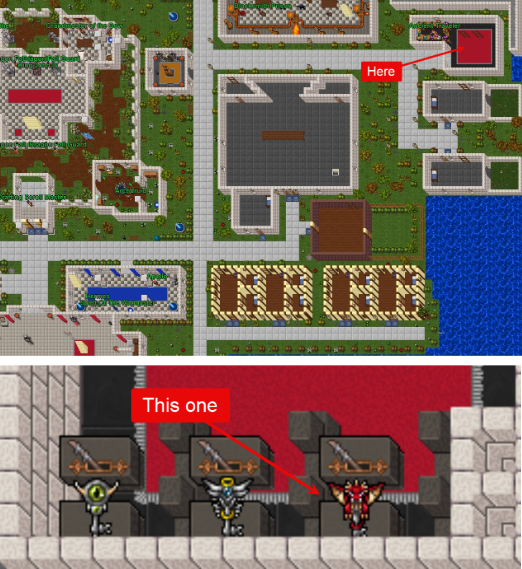
Travel to Dragon Fall and locate the building with the NPC Ancient Traveler.
- Climb upstairs and purchase the Dragon Key (25610) by right-clicking the lever beside it.
- Cost: 75 Golden Tokens.
Part 2 – Entering the Quest Area (PoH)
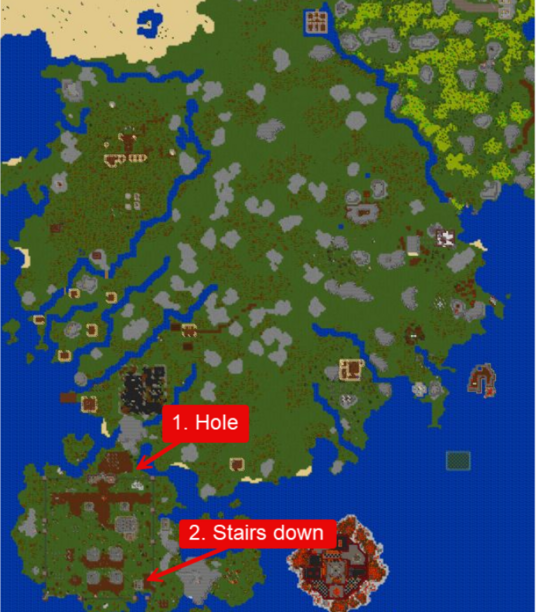
1. From Venore, run to the Plains of Havoc; the target area is south of the Dark Cathedral. 2. At spot (1) on your map, jump down the small hole; run south and rope up into an area swarming with Bloody Spiders.
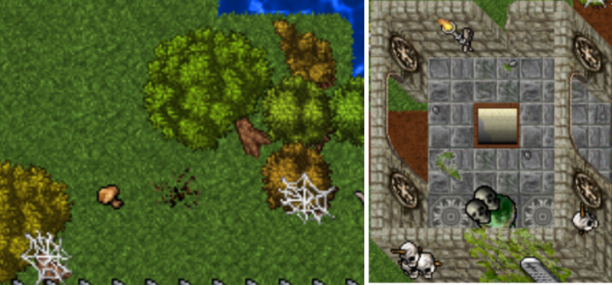
3. Continue south to a small building with stairs down (2); descend.
4. In the Fury cave, move to the skull formation at the center; use a Pick to break it and jump down.
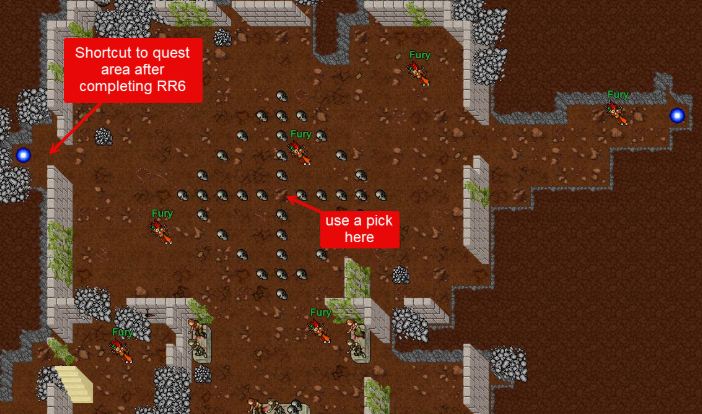
5. In the next floor, go southeast and take the stairs down; then go northwest and jump the next hole.
6. Follow the indicated path to a guarded building:
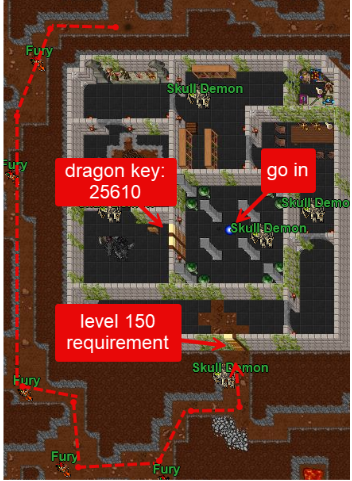
Entry requires Level 150+ Inside, use the Dragon Key (25610) on the locked door and take the blue teleport
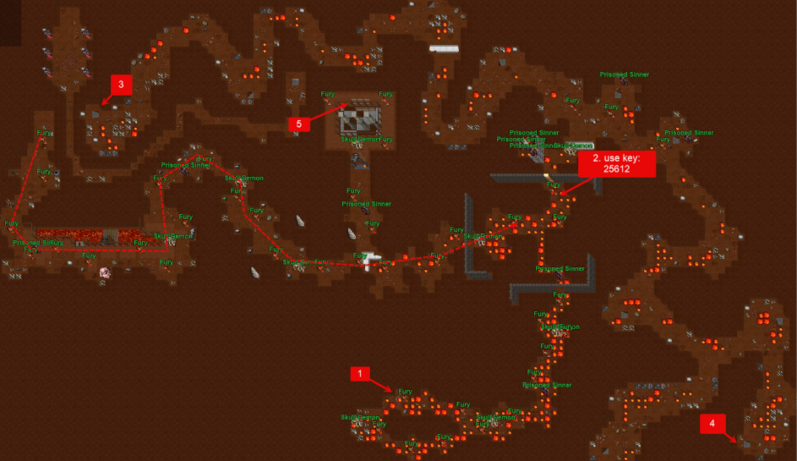
Now you must collect **three keys** from chests to unlock the main quest zone.
Key Collection
- Go to spot (1): a sewer hole under a fire field. Use your Destroy Field Rune, jump down, and loot Key (25612) from the chest.
- Return and open the door at spot (2) with Key (25612).
- Loot Key (25613) at spot (3) and Key (25614) at spot (4).
- Proceed to spot (5) and take the stairs down to reach the Main Quest Location.
- Use Keys (25613) and (25614) on the doors to enter.
- The nearby blue teleport is an exit that returns you to the pre-door room (where you used the Dragon Key).
Part 3 – The Four Sigils (Boss Thrones)
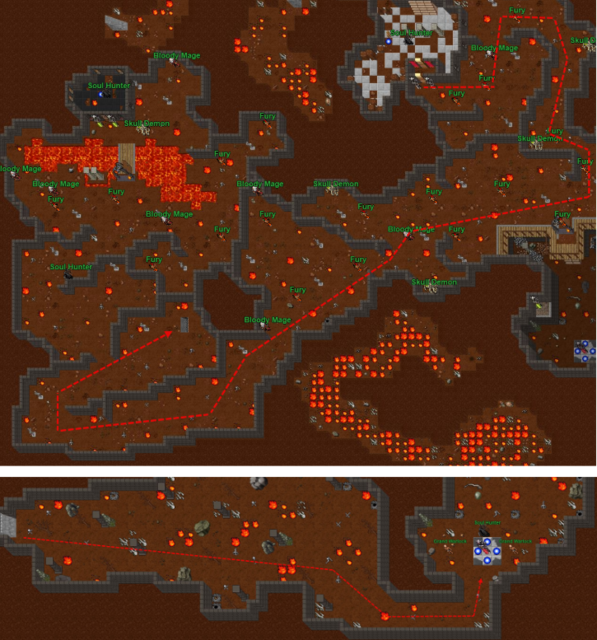
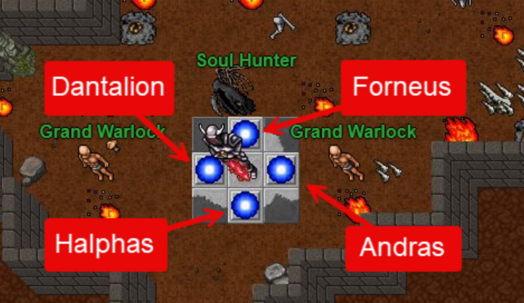
Your objective is to activate the four thrones by visiting each trial via the four blue portals.
Order does not matter. Killing each boss spawns a return portal, but is not strictly required to progress.
Note: These bosses have a small chance to drop a Sapphire Amulet,godly earrings,pyromancer earrings which is used in later content — it is recommended to defeat them.
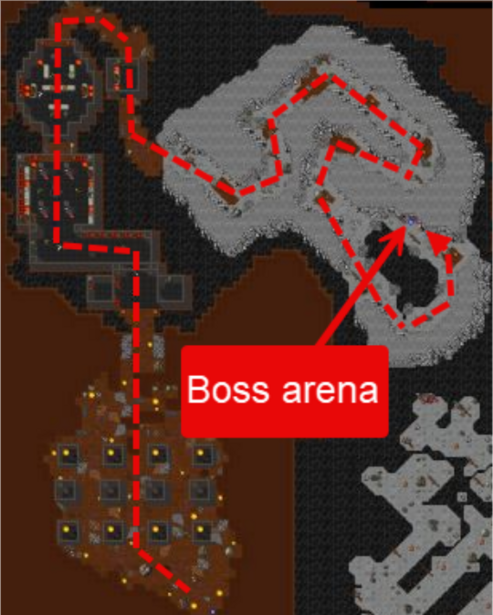
- Andras
- Follow the marked route to Andras. Step on the throne in his arena.
- Area mobs: Skull Demons.
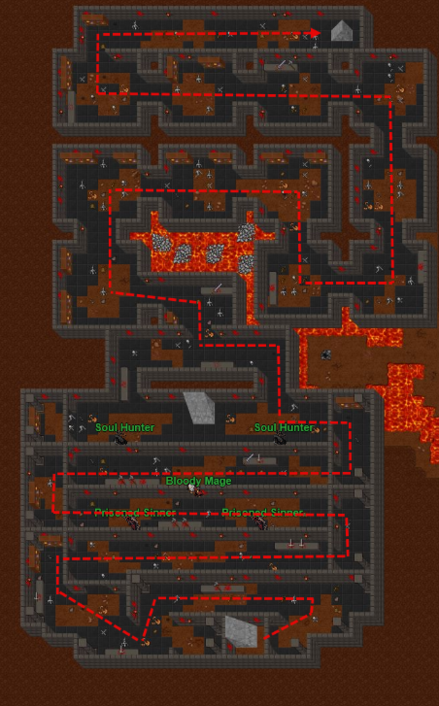
- Forneus
- Follow the route to Forneus. Step on the throne
- Area mobs: Prisoned Sinners, Soul Hunters, Bloody Mages.
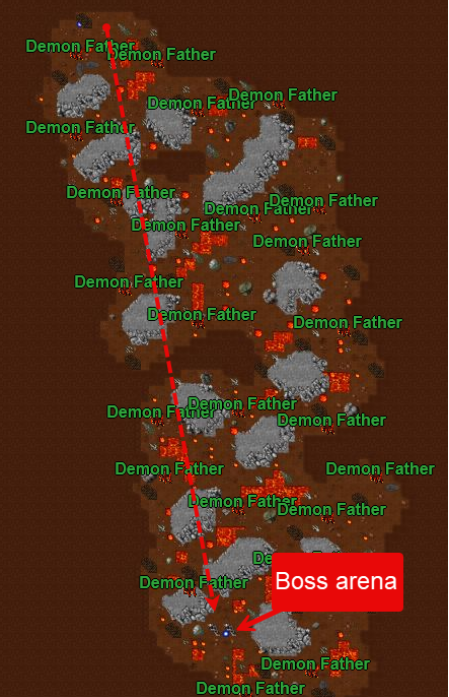
- Dantalion
- Follow the route to Dantalion. Step on the throne.
- Area mobs: Demon Fathers.
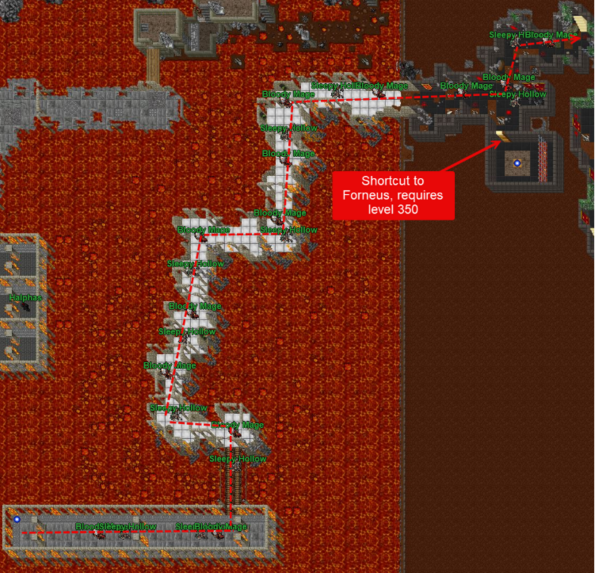
- Halphas
- Follow the route to Halphas. Step on the throne.
- Area mobs: Sleepy Hollows, Bloody Mages.
After activating all four thrones, the path to the final encounter opens.
Part 4 – Final Boss: Baphomet
1. Go upstairs via the staircase just north of the hub.
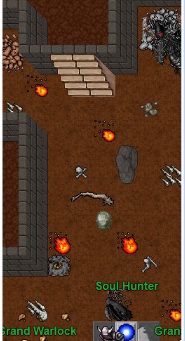
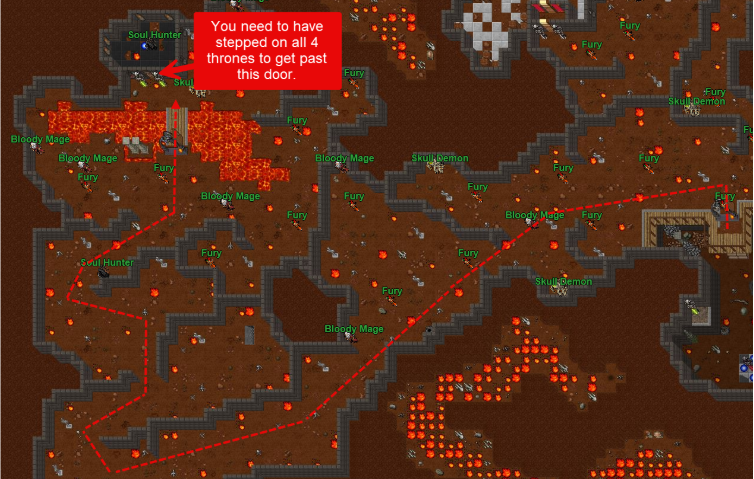
2. Follow the red-marked path, pass the door, and take the teleport in that room.
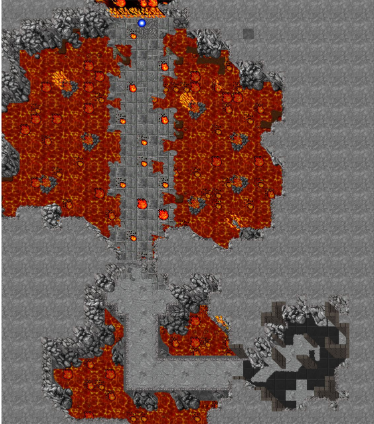
3. After teleporting, move **west**, then follow the path north to a new blue portal; enter to reach the Baphomet arena (boss room is at the **upper** section).
Mechanics & Tips
- Baphomet summons Bloody Mages near himself. Using fire Bomb runes around the boss can prevent their spawns.
- Applies multiple curses: slow, reduced healing, reduced mana healing.
- Recommended: a Druid using
exura sioon a tank or strong lifesteal gear.
On victory, a blue portal appears at the top of the room between two statues.
OBS: Before leaving, loot the Blue Spiritual Wand from Baphomet’s corpse – it is required for the next storyline quest (Zepar chain).
Part 5 – Reward Room
Enter the portal to the Reward Room.
- Claim all rewards and exit via one of the teleports, or use a Teleport Crystal (store item) to leave.
- Exit portals return you to the start of the Main Quest Area.
Quest Complete
You have completed Rorina Quest – Part 6.
The Rorina line concludes here, but the story continues with the Zepar quest chain — first step: Zepar part 1.
Tips
- Bring a Destroy Field Rune, Pick, and ample Fire Bomb runes for add control.
- High burst and cleanse support mitigate Baphomet’s healing/mana-healing debuffs.
- Sapphire Amulet, pyromancer earrings and godly earrings drops are rare — consider farming the four trial bosses if you plan for future content.
