Rorina part 4 Quest Spoiler: Difference between revisions
Wearetibia (talk | contribs) |
Wearetibia (talk | contribs) |
||
| (8 intermediate revisions by the same user not shown) | |||
| Line 3: | Line 3: | ||
== Rewards == | == Rewards == | ||
* '''Demonic Bracelet''' | * '''Demonic Bracelet''' | ||
* '''Mysterious Violet Gem''' – required for [[Rorina | * '''Mysterious Violet Gem''' – required for [[Rorina part 5 Quest Spoiler]] | ||
* '''One item of your choice:''' | * '''One item of your choice:''' | ||
** Demonic Helmet | ** Demonic Helmet | ||
| Line 71: | Line 71: | ||
Descend through the hole once it opens. | Descend through the hole once it opens. | ||
----[[File:Rr4 d.png|thumb|475x475px|left]] | ----[[File:Rr4 d.png|thumb|475x475px|left]] | ||
[[File:Rr4 e.png|thumb|553x553px]] | [[File:Rr4 e.png|thumb|553x553px]] | ||
| Line 95: | Line 99: | ||
=== Step 4 – The Depths Below === | === Step 4 – The Depths Below === | ||
[[File:Aaaaaaaaaaaaa.png|center|thumb|1207x1207px]] | |||
As you proceed, you’ll encounter: | As you proceed, you’ll encounter: | ||
* A '''door requiring completion of Rorina Part 3'''. | * A '''door requiring completion of Rorina Part 3'''. | ||
| Line 106: | Line 111: | ||
Jump down through the opening — monsters await below, so be prepared for immediate combat. | Jump down through the opening — monsters await below, so be prepared for immediate combat. | ||
[[File:Bbbbbbbbbbbbbbbbbbbbbbbbbbbb.png|center|thumb|953x953px]] | |||
---- | ---- | ||
=== Step 5 – The Final Trial === | === Step 5 – The Final Trial === | ||
[[File:Rthwrh.png|center|thumb|1160x1160px]] | |||
This final section houses the quest boss, '''Jormungandr'''. He is sealed behind two gates, each controlled by a separate lever. | This final section houses the quest boss, '''Jormungandr'''. He is sealed behind two gates, each controlled by a separate lever. | ||
| Line 124: | Line 130: | ||
* A teleport will appear — use it before it disappears to access the '''reward room'''. | * A teleport will appear — use it before it disappears to access the '''reward room'''. | ||
* Inside, collect your chosen main reward and, if applicable, one extra reward item. | * Inside, collect your chosen main reward and, if applicable, one extra reward item. | ||
* Exit through either of the two teleports in the room to complete the quest. | * Exit through either of the two teleports in the room to complete the quest.[[File:Aaaaaaaaaaaaaaaaaaaaaaaaaaaaaaaaaaaaaaaaaaaa.png|center|thumb|545x545px|a]] | ||
---- | ---- | ||
| Line 131: | Line 137: | ||
Congratulations — you have completed '''Rorina Quest – Part 4'''. | Congratulations — you have completed '''Rorina Quest – Part 4'''. | ||
You now possess the '''Mysterious Violet Gem''', a crucial item for the continuation of your journey in [[Rorina Quest | You now possess the '''Mysterious Violet Gem''', a crucial item for the continuation of your journey in [[Rorina part 5 Quest Spoiler]]. | ||
For additional visual guidance, visit the [https://wearedragons.info/index.php/Rorina_part_4_Quest_Spoiler official WeAreDragons quest spoiler page]. | For additional visual guidance, visit the [https://wearedragons.info/index.php/Rorina_part_4_Quest_Spoiler official WeAreDragons quest spoiler page]. | ||
Latest revision as of 00:41, 10 October 2025
Rorina Quest – Part 4
Rewards
- Demonic Bracelet
- Mysterious Violet Gem – required for Rorina part 5 Quest Spoiler
- One item of your choice:
- Demonic Helmet
- Demonic Armor
- Demonic Legs
- Demonic Boots
- Extra Reward (choose one only):
- Blood Axe
- Zaoan Robe
Requirements
- Completion of Rorina Quest – Part 3
- Level 100 or higher
- Shovel
- Purple Key (25602) – obtained at the end of Part 3
Locations
- Thais
- Ankrahmun
Enemies
Monsters
- Low-tier Undead (various)
- Serpent Spawn
- Hydra
- Undead Hydra
- Draken Warmaster
- Draken Elite
- Various Lizards
Boss
- Jormungandr
Quest Walkthrough

Step 1 – Retrieve the Mysterious Green Gem
Return to Rorina’s Castle in Thais.
Use your Purple Key (25602) to unlock the western door of the castle that leads to a room containing a blue treasure chest.
Open the chest to obtain the Mysterious Green Gem (KEEP IN MAIN BACKPACK) — keep it in your inventory throughout the quest, as it will be sacrificed later to progress.

Step 2 – Travel to Ankrahmun
Use a boat to sail from Thais to Ankrahmun.
Once there, follow red-marked path on your quest map leading to a small pyramid.
At the pyramid:
- Use a shovel at the location marked by a WAD Coin symbol on your map.
- It may take several attempts for the hole to appear.
Descend through the hole once it opens.


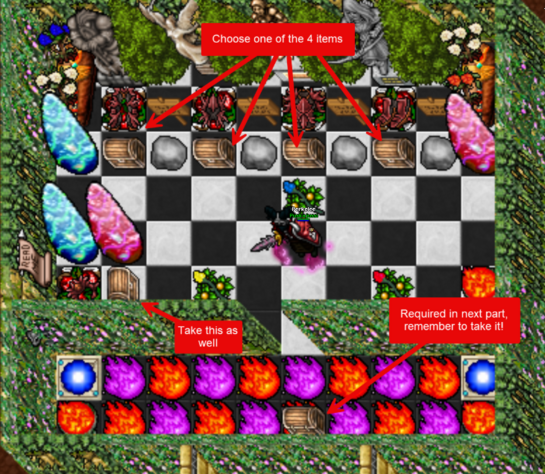
Follow the red-arrow path shown in the reference images until you reach a branching point.
- Yellow arrows mark the route to an optional reward area — claim it if desired before continuing.
After collecting (or skipping) the extra reward, locate the hidden hole behind a tree and descend again to continue.
Step 4 – The Depths Below

As you proceed, you’ll encounter:
- A door requiring completion of Rorina Part 3.
- A Level 100 door.
Ensure you meet both conditions to continue.
Upon entering the chamber with a green pedestal, your Mysterious Green Gem will be automatically consumed to unlock the path ahead.
(If you forgot the gem, you must return to Rorina’s Castle to retrieve it.)
Jump down through the opening — monsters await below, so be prepared for immediate combat.

Step 5 – The Final Trial

This final section houses the quest boss, Jormungandr. He is sealed behind two gates, each controlled by a separate lever.
- Pull both levers to unlock the gates.
- Be warned — activating a lever summons a wave of **Undead Hydras** nearby!
Clear them quickly before engaging the boss.
Once the gates open, confront Jormungandr. He deals heavy physical and poison damage.
Step 6 – Claiming the Rewards
After defeating Jormungandr:
- A teleport will appear — use it before it disappears to access the reward room.
- Inside, collect your chosen main reward and, if applicable, one extra reward item.
- Exit through either of the two teleports in the room to complete the quest.
a

Quest Complete
Congratulations — you have completed Rorina Quest – Part 4.
You now possess the Mysterious Violet Gem, a crucial item for the continuation of your journey in Rorina part 5 Quest Spoiler.
For additional visual guidance, visit the official WeAreDragons quest spoiler page.
Tip: Equip strong anti-undead and anti-poison gear. The Hydra ambushes can be lethal if unprepared — consider bringing area-damage spells, healing potions, and defensive buffs. A coordinated team run is highly recommended for the boss encounter.