|
|
| (11 intermediate revisions by the same user not shown) |
| Line 1: |
Line 1: |
| | = Rorina Quest – Part 3 = |
|
| |
|
| = '''<span style="font-family:Verdana,Geneva,sans-serif"><span style="font-size:xx-large">Rorina's Third Quest</span></span>''' = | | == Rewards == |
| | * '''Hermes Access Scroll''' – grants access to temple blessings via the Temple NPC |
| | * '''Purple Key (25602)''' – required for [[Rorina part 4 Quest Spoiler]] |
| | * '''Rare Yellow Enchant Gem''' |
| | * '''One item of your choice:''' |
| | ** Purple Devil Outfit (T1) |
| | ** Demonic Axe |
| | ** Steel Mace |
| | ** Demonic Sword |
| | ** Demonic Spellbook |
| | ** Crystal Crossbow |
| | ** Rainbow Shield |
|
| |
|
|
| | ---- |
|
| |
|
| == <span style="font-size:x-large">'''<span style="font-family:Verdana,Geneva,sans-serif">Reward</span>'''</span> == | | == Requirements == |
| | * Completion of '''Rorina Quest – Part 2''' |
| | * Level 90 or higher |
| | * Golden Key (25600) |
| | * Rope |
| | * Shovel |
|
| |
|
| ---- | | ---- |
|
| |
|
| *'''<span style="font-size:medium"><span style="font-family:Verdana,Geneva,sans-serif">Ability to go to the next mission in history</span></span>'''
| | == Locations == |
| *<span style="font-size:medium"><span style="font-family:Verdana,Geneva,sans-serif">Rare Yellow Enchant Gem</span></span>
| | * Thais |
| *<span style="font-size:medium"><span style="font-family:Verdana,Geneva,sans-serif">Purple Key (Key:25602)</span></span> | | * Eremo's island |
| | | * Fibula (main quest area) |
| <span style="font-size:medium"><span style="font-family:Verdana,Geneva,sans-serif">Only one among these items:</span></span>
| |
| | |
| *<span style="font-size:medium"><span style="font-family:Verdana,Geneva,sans-serif">Outfit Book (Purple Devil Outfit - T1)</span></span> | |
| *<span style="font-size:medium"><span style="font-family:Verdana,Geneva,sans-serif">Demonic Axe</span></span> | |
| *<span style="font-size:medium"><span style="font-family:Verdana,Geneva,sans-serif">Demonic Sword</span></span>
| |
| *<span style="font-size:medium"><span style="font-family:Verdana,Geneva,sans-serif">Demonic Mace</span></span>
| |
| *<span style="font-size:medium"><span style="font-family:Verdana,Geneva,sans-serif">Demonic Spellbook</span></span>
| |
| *<span style="font-size:medium"><span style="font-family:Verdana,Geneva,sans-serif">Crystal Crossbow</span></span>
| |
| *<span style="font-size:medium"><span style="font-family:Verdana,Geneva,sans-serif">Rainbow Shield (Faster Regeneration)</span></span>
| |
| | |
|
| |
| | |
| == <span style="font-size:x-large">'''<span style="font-family:Verdana,Geneva,sans-serif">Location</span>'''</span> ==
| |
|
| |
|
| ---- | | ---- |
|
| |
|
| <span style="font-family:Verdana,Geneva,sans-serif"><span style="font-size:medium">Fibula</span></span>
| | == Enemies == |
| | | '''Monsters''' |
|
| | * Witch Agatha |
| | * Deathlord |
| | * Nightmare |
| | * Blightwalker |
| | * Hand of Cursed Fate |
| | * White Dragon |
| | * Solar Dragon |
| | * Undead Dragon |
| | * Grim Reaper |
| | * Hellhound |
| | * Ghastly Dragon |
| | * Demon Father |
|
| |
|
| == <span style="font-size:x-large">'''<span style="font-family:Verdana,Geneva,sans-serif">You will face</span>'''</span> ==
| | '''Bosses''' |
| | * Astarith |
| | * Dhampir |
|
| |
|
| ---- | | ---- |
|
| |
|
| *<span style="font-size:medium"><span style="font-family:Verdana,Geneva,sans-serif">Blightwalker</span></span>
| | == Quest Walkthrough == |
| *<span style="font-size:medium"><span style="font-family:Verdana,Geneva,sans-serif">Nightmare</span></span>
| |
| *<span style="font-size:medium"><span style="font-family:Verdana,Geneva,sans-serif">Deathlord</span></span>
| |
| *<span style="font-size:medium"><span style="font-family:Verdana,Geneva,sans-serif">Witch Agatha</span></span>
| |
| *<span style="font-size:medium"><span style="font-family:Verdana,Geneva,sans-serif">Solar Dragon</span></span>
| |
| *<span style="font-size:medium"><span style="font-family:Verdana,Geneva,sans-serif">White Dragon</span></span>
| |
| *<span style="font-size:medium"><span style="font-family:Verdana,Geneva,sans-serif">Grim Reaper</span></span>
| |
| *<span style="font-size:medium"><span style="font-family:Verdana,Geneva,sans-serif">Gastly Dragon</span></span>
| |
| *<span style="font-size:medium"><span style="font-family:Verdana,Geneva,sans-serif">Demon Father</span></span>
| |
| *<span style="font-size:medium"><span style="font-family:Verdana,Geneva,sans-serif">Hellhound</span></span>
| |
| *<span style="font-size:medium"><span style="font-family:Verdana,Geneva,sans-serif">Undead Dragon</span></span>
| |
| *<span style="font-size:medium"><span style="font-family:Verdana,Geneva,sans-serif">Dark torturer</span></span>
| |
| *<span style="font-size:medium"><span style="font-family:Verdana,Geneva,sans-serif">Hand of Cursate Fate</span></span>
| |
|
| |
|
|
| | === Step 1 – Return to Rorina === |
| | Head back to Rorina’s Castle in Thais and speak with '''NPC Rorina'''. |
|
| |
|
|
| | Use the dialogue: |
| | * <code>hi</code> |
| | * <code>mission</code> |
|
| |
|
| == <span style="font-size:x-large">'''<span style="font-family:Verdana,Geneva,sans-serif">Mini-bosses</span>'''</span> ==
| | Rorina will inform you she is currently occupied and directs you to speak with her sister, '''NPC Farina''', who resides just north of her location. |
|
| |
|
| ---- | | ---- |
|
| |
|
| <span style="font-family:Verdana,Geneva,sans-serif"><span style="font-size:medium">None</span></span>
| | === Step 2 – Meet Farina === |
| | Find '''NPC Farina''' and initiate dialogue: |
| | * <code>hi</code> |
| | * <code>mission</code> |
| | * <code>yes</code> |
| | * <code>yes</code> |
|
| |
|
|
| | She will send you to meet '''Eremo''', a sage who holds the next key to your journey. |
| | |
| == <span style="font-size:x-large">'''<span style="font-family:Verdana,Geneva,sans-serif">Bosses</span>'''</span> ==
| |
|
| |
|
| ---- | | ---- |
|
| |
|
| *<span style="font-family:Verdana,Geneva,sans-serif"><span style="font-size:medium">Astarith</span></span>
| | === Step 3 – Visit Eremo === |
| *<span style="font-family:Verdana,Geneva,sans-serif"><span style="font-size:medium">Dhampir</span></span> | | Travel to '''Eremo’s''' island: |
| | * Boat Route: '''Edron → Cormaya → Eremo''' |
|
| |
|
|
| | At '''Eremo’s''' house: |
| | * Use your '''Golden Key (25600)''' to unlock the door (if closed). |
| | * Open the chest inside to obtain the new '''Purple Key (25601)'''. |
| | This key will be needed shortly at Fibula. |
|
| |
|
| == <span style="font-size:x-large">'''<span style="font-family:Verdana,Geneva,sans-serif">Level</span>'''</span> ==
| | ---- |
|
| |
|
| ---- | | === Step 4 – Journey to Fibula === |
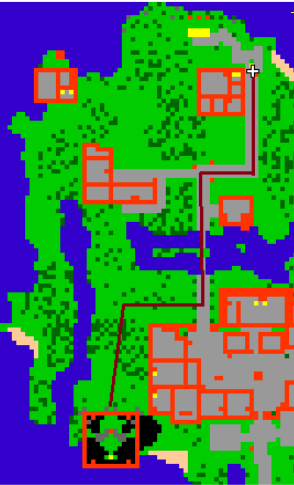
| | Return to Thais and follow the r'''ed-marked path''' shown on the quest map to reach the next quest castle in '''Fibula'''. |
|
| |
|
| <span style="font-size:medium"><span style="font-family:Verdana,Geneva,sans-serif">90 (Recommended: 130)</span></span>
| | At the castle entrance, there is a Quest Gathering Stone beside the door. |
|
| |
|
|
| | Use the newly acquired '''Purple Key (25601)''' to open it. |
|
| |
|
| == <span style="font-size:x-large">'''<span style="font-family:Verdana,Geneva,sans-serif">Difficulty</span>'''</span> ==
| | Proceed inside and through the next door (access is restricted unless you have completed '''Rorina Part 2'''). |
|
| |
|
| | Step onto the '''southern teleport''' — no monsters appear at this stage. |
| | [[File:Rr3 fibula.png|center|thumb]] |
| ---- | | ---- |
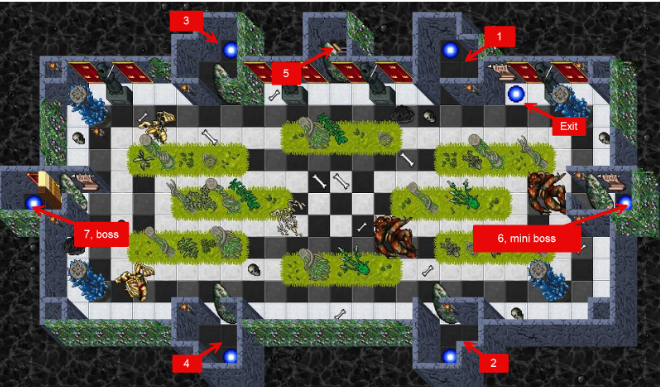
| | [[File:Rr3 teleports.png|center|thumb|660x660px]] |
|
| |
|
| [[File:Star1.png|25x25px|Star1.png]][[File:Star1.png|25x25px|Star1.png]][[File:Star1.png|25x25px|Star1.png]]
| | === Step 5 – The Trial Teleport Chambers === |
| | You will arrive in a large ''<u>Teleport Hub Room</u>'' containing multiple teleports and sealed pathways. To progress, you must clear each trial area in the correct order and pull a '''<u>''lever''</u>''' at the end of each. |
|
| |
|
|
| | Each lever you activate removes a stone barrier blocking the next teleport. Follow the numerical order shown on the quest map. |
|
| |
|
| == <span style="font-size:x-large">'''<span style="font-family:Verdana,Geneva,sans-serif">Quest Duration</span>'''</span> ==
| | '''Trial 1:''' |
| | * Enemies – Witch Agatha, Deathlord |
| | * Objective – Pull the lever at the end before teleporting back. |
|
| |
|
| ----
| | '''Trial 2:''' |
| | * Enemies – Nightmare, Blightwalker, Hand of Cursed Fate |
| | * Objective – Pull lever to the right before using teleport. |
|
| |
|
| <span style="font-family:Verdana,Geneva,sans-serif"><span style="font-size:medium">Short</span></span>
| | '''Trial 3:''' |
| | * Enemies – White Dragon, Solar Dragon, Undead Dragon |
| | * Objective – Pull lever to unlock the next chamber. |
|
| |
|
|
| | '''Trial 4:''' |
| | * Enemies – Grim Reaper, Hellhound, Ghastly Dragon, Demon Father |
| | * Objective – Pull lever to complete the trial sequence. |
|
| |
|
| == <span style="font-size:x-large">'''<span style="font-family:Verdana,Geneva,sans-serif">Group</span>'''</span> ==
| | After all four levers are activated, a stone in the **main teleport room** will vanish, revealing **Lever (5)**. |
| | Pull it, then step into **Teleport (6)** to advance. |
|
| |
|
| ---- | | ---- |
|
| |
|
| <span style="font-size:medium"><span style="font-family:Verdana,Geneva,sans-serif">3+</span></span>
| | === Step 6 – Mini-Boss Encounter === |
| | You will be transported to a Mini-Boss Preparation Room containing multiple teleports. |
|
| |
|
|
| | Defeat the assigned mini-boss. |
|
| |
|
| == <span style="font-size:x-large">'''<span style="font-family:Verdana,Geneva,sans-serif">Requirements</span>'''</span> ==
| | After victory: Pull the lever inside that room. Use '''Teleport''' to return to the main teleport chamber. |
|
| |
|
| ---- | | ---- |
|
| |
|
| *<span style="font-family:Verdana,Geneva,sans-serif"><span style="font-size:medium">Rope</span></span>
| | === Step 7 – The Final Challenge === |
| *<span style="font-family:Verdana,Geneva,sans-serif"><span style="font-size:medium">Shovel</span></span>
| | From the main teleport room, head west and pass through the Level 90 door, then step into the next teleport. |
| *<span style="font-size:medium"><span style="font-family:Verdana,Geneva,sans-serif">Purple Key (Key:25600)</span></span>
| |
| *<span style="font-size:medium"><span style="font-family:Verdana,Geneva,sans-serif">Purple Key (Key:25601)</span></span>
| |
|
| |
|
|
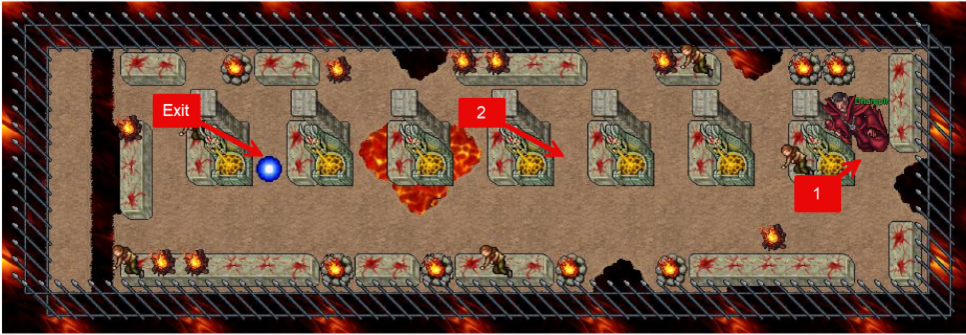
| | You will enter the Final Boss Room — the boss awaits on the eastern side. |
|
| |
|
| == <span style="font-size:x-large">'''<span style="font-family:Verdana,Geneva,sans-serif">Method</span>'''</span> ==
| | Defeat the boss (Astarith or Dhampir depending on instance). |
|
| |
|
| | A '''<u>''timed portal''</u>''' will appear at the position shown on the map '''(portal 2).''' Step through it to reach the reward room |
| | [[File:Rr3 boss.png|center|thumb|966x966px]] |
| ---- | | ---- |
| | [[File:Rr3 rewards.png|center|thumb|585x585px]] |
|
| |
|
| <span style="font-size:medium"><span style="font-family:Verdana,Geneva,sans-serif">Go to Thais' boat, travel to Edron, then to Cormaya and then to Eremo Island</span></span>
| | === Step 8 – Claim Your Rewards === |
| | Inside the reward room: |
| | * Collect your selected reward item. |
| | * Take all other available quest rewards. |
| | * Exit via the teleport to complete the quest. |
|
| |
|
| <span style="font-size:medium"><span style="font-family:Verdana,Geneva,sans-serif">[[File:Rr3a.png|RTENOTITLE]]</span></span>
| | ---- |
| | |
| <span style="font-size:medium"><span style="font-family:Verdana,Geneva,sans-serif">Walk a little to the east, you will have a closed house. Use the key you earned on Rorina's second mission to open the house and finally open the chest and get the other key</span></span>
| |
| | |
| [[File:Rr3b.png|RTENOTITLE]]
| |
| | |
| <span style="font-size:medium"><span style="font-family:Verdana,Geneva,sans-serif">Go back to Thais and go to the city of Fibula, holding the key you picked up on Eremo Island.</span></span>
| |
| | |
| <span style="font-size:medium"><span style="font-family:Verdana,Geneva,sans-serif">[[File:Rr3c.png|RTENOTITLE]]</span></span>
| |
| | |
| <span style="font-size:medium"><span style="font-family:Verdana,Geneva,sans-serif">[[File:Rr3d.png|RTENOTITLE]]</span></span>
| |
| | |
| <span style="font-size:medium"><span style="font-family:Verdana,Geneva,sans-serif">[[File:Rr3e.png|RTENOTITLE]]</span></span>
| |
| | |
| <span style="font-size:medium"><span style="font-family:Verdana,Geneva,sans-serif">[[File:Rr3f.png|RTENOTITLE]]</span></span>
| |
| | |
| <span style="font-size:medium"><span style="font-family:Verdana,Geneva,sans-serif">[[File:Rr3g.png|RTENOTITLE]]</span></span>
| |
| | |
| <span style="font-size:medium"><span style="font-family:Verdana,Geneva,sans-serif">[[File:Rr3h.png|RTENOTITLE]]</span></span>
| |
| | |
| <span style="font-size:medium"><span style="font-family:Verdana,Geneva,sans-serif">[[File:Rr3i.png|RTENOTITLE]]</span></span>
| |
| | |
| <span style="font-size:medium"><span style="font-family:Verdana,Geneva,sans-serif">[[File:Rr3j.png|RTENOTITLE]]</span></span>
| |
| | |
| <span style="font-size:medium"><span style="font-family:Verdana,Geneva,sans-serif">Use the key you got from Eremo Island to open the first door, remembering that, in order for you to be allowed to go through the second door, you will need to have done Rorina's second mission and have taken the items from the chest at the end</span></span>
| |
| | |
| <span style="font-size:medium"><span style="font-family:Verdana,Geneva,sans-serif">[[File:Rr3k.png|RTENOTITLE]]</span></span>
| |
| | |
| <span style="font-size:medium"><span style="font-family:Verdana,Geneva,sans-serif">This will be the main room, only the first will be open initially, you will have to enter the rooms in numerical sequence, go through the monsters and, at the end of each room, there will be a lever responsible for releasing the next room.</span></span>
| |
|
| |
|
| <span style="font-size:medium"><span style="font-family:Verdana,Geneva,sans-serif">In order, you will face:</span></span>
| | == Quest Complete == |
| | | Congratulations! You have completed '''Rorina Quest – Part 3'''. |
| <span style="font-size:medium"><span style="font-family:Verdana,Geneva,sans-serif">'''In room 1:'''<br/> Blightwalker<br/> Nightmare<br/> Hand of Cursate Fate</span></span>
| | You now possess the '''Purple Key (25602)''', required to continue your adventure in [[Rorina part 4 Quest Spoiler]]. |
| | |
| <span style="font-size:medium"><span style="font-family:Verdana,Geneva,sans-serif">'''In room 2:'''<br/> Deathlord<br/> Witch Agatha</span></span>
| |
| | |
| <span style="font-size:medium"><span style="font-family:Verdana,Geneva,sans-serif">'''In room 3:'''<br/> Solar Dragon<br/> White Dragon<br/> Undead Dragon</span></span>
| |
| | |
| <span style="font-size:medium"><span style="font-family:Verdana,Geneva,sans-serif">'''In room 4:'''<br/> Grim Reaper<br/> Gastly Dragon<br/> Demon Father<br/> Hellhound<br/> Dark torturer</span></span>
| |
| | |
| <span style="font-size:medium"><span style="font-family:Verdana,Geneva,sans-serif">After passing through the four rooms and pulling the levers at the end of each room, you will release the stone to activate the lever 5. Then, you will have the free way to access the portal of the path 6, to the east of the main room, there you will face the 2 bosses</span></span>
| |
| | |
|
| |
| | |
| <span style="font-size:medium"><span style="font-family:Verdana,Geneva,sans-serif">[[File:Rr3salaprincipal.png|RTENOTITLE]]</span></span>
| |
| | |
| <span style="font-size:medium"><span style="font-family:Verdana,Geneva,sans-serif">'''In room 1:'''<br/> Blightwalker<br/> Nightmare<br/> Hand of Cursate Fate</span></span>
| |
| | |
| <span style="font-size:medium"><span style="font-family:Verdana,Geneva,sans-serif">[[File:Sala1a.png|RTENOTITLE]]</span></span>
| |
| | |
| <span style="font-size:medium"><span style="font-family:Verdana,Geneva,sans-serif">[[File:Sala1b.png|RTENOTITLE]]</span></span>
| |
| | |
| <span style="font-size:medium"><span style="font-family:Verdana,Geneva,sans-serif">'''In room 2:'''<br/> Deathlord<br/> Witch Agatha</span></span>
| |
| | |
| <span style="font-size:medium"><span style="font-family:Verdana,Geneva,sans-serif">[[File:Sala2a.png|RTENOTITLE]]</span></span>
| |
| | |
| <span style="font-size:medium"><span style="font-family:Verdana,Geneva,sans-serif">[[File:Sala2b.png|RTENOTITLE]]</span></span>
| |
| | |
| <span style="font-size:medium"><span style="font-family:Verdana,Geneva,sans-serif">'''In room 3:'''<br/> Solar Dragon<br/> White Dragon<br/> Undead Dragon</span></span>
| |
| | |
| <span style="font-size:medium"><span style="font-family:Verdana,Geneva,sans-serif">[[File:Sala3a.png|RTENOTITLE]]</span></span>
| |
| | |
| <span style="font-size:medium"><span style="font-family:Verdana,Geneva,sans-serif">[[File:Sala3b.png|RTENOTITLE]]</span></span>
| |
| | |
| <span style="font-size:medium"><span style="font-family:Verdana,Geneva,sans-serif">'''In room 4:'''<br/> Grim Reaper<br/> Gastly Dragon<br/> Demon Father<br/> Hellhound<br/> Dark torturer</span></span>
| |
| | |
| <span style="font-size:medium"><span style="font-family:Verdana,Geneva,sans-serif">[[File:Sala4a.png|RTENOTITLE]]</span></span>
| |
| | |
| <span style="font-size:medium"><span style="font-family:Verdana,Geneva,sans-serif">[[File:Sala4b.png|RTENOTITLE]]</span></span>
| |
| | |
| <span style="font-size:medium"><span style="font-family:Verdana,Geneva,sans-serif">[[File:Rr3salaprincipalgif.gif|RTENOTITLE]]</span></span>
| |
| | |
| <span style="font-size:medium"><span style="font-family:Verdana,Geneva,sans-serif">[[File:Rr3salaboss.png|RTENOTITLE]]</span></span>
| |
| | |
| <span style="font-size:medium"><span style="font-family:Verdana,Geneva,sans-serif">[[File:Rr3boss.gif|RTENOTITLE]]</span></span>
| |
| | |
| <span style="font-size:medium"><span style="font-family:Verdana,Geneva,sans-serif">[[File:Rr3boss2.png|RTENOTITLE]]</span></span>
| |
| | |
| <span style="font-size:medium"><span style="font-family:Verdana,Geneva,sans-serif">This lever will clear the path to the west of the main room, which will take you to the rewards room. But first you’ll have to go through the last boss</span></span>
| |
| | |
| <span style="font-size:medium"><span style="font-family:Verdana,Geneva,sans-serif">[[File:Rr3boss3.png|RTENOTITLE]]</span></span>
| |
| | |
| <span style="font-size:medium"><span style="font-family:Verdana,Geneva,sans-serif">[[File:Rr3boss4.gif|RTENOTITLE]]</span></span>
| |
| | |
| <span style="font-size:medium"><span style="font-family:Verdana,Geneva,sans-serif">After killing the second boss and entering the portal, you will be teleported to the main room, just follow the path 7 indicated in the image of the main room, just above. That is, just walk west and enter the portal, you will go straight to the rewards room<br/> <br/> Below is the image of the rewards room map, walk north and you will see the chests, it will be possible to get an item on the left and the gem plus the key</span></span>
| |
| | |
| <span style="font-size:medium"><span style="font-family:Verdana,Geneva,sans-serif">[[File:Rr3salafinal.png|RTENOTITLE]]</span></span>
| |
| | |
| <span style="font-size:medium"><span style="font-family:Verdana,Geneva,sans-serif">[[File:Rr3recompensa.png|RTENOTITLE]]</span></span>
| |
| | |
| <span style="font-size:medium"><span style="font-family:Verdana,Geneva,sans-serif">[[File:Rr3final.png|RTENOTITLE]]</span></span>
| |
| | |
| <span style="font-size:medium"><span style="font-family:Verdana,Geneva,sans-serif">After collecting the rewards, you will be able to advance to Rorina's fourth mission. So, go to the city of Thais, walk to the castle of Rorina, next to it you will have a closed room, use the key you won in the quest to open it and get the gem that will give you permission to pass at the next door mission.</span></span>
| |
| | |
| [[File:Rr3abrindocastelo.gif|RTENOTITLE]]
| |
| | |
|
| |
| | |
| <br/>
| |
| | |
| == '''<span style="font-size:x-large"><span style="font-family:Verdana,Geneva,sans-serif">Transcription</span></span>''' ==
| |
|
| |
|
| ---- | | ---- |
|
| |
|
| <span style="font-size:medium"><span style="font-family:Verdana,Geneva,sans-serif">'''Player:''' Hi</span></span>
| | ''Tip:'' Bring area-of-effect spells, anti-undead equipment, and high-resistance gear. The trial areas escalate rapidly in difficulty, and multiple high-tier monsters spawn simultaneously. Group play is strongly recommended. |
| | |
| <span style="font-size:medium"><span style="font-family:Verdana,Geneva,sans-serif">'''Farina:''' Hello there lil'one, what you want?</span></span>
| |
| | |
| <span style="font-size:medium"><span style="font-family:Verdana,Geneva,sans-serif">'''Player: '''Third Mission</span></span>
| |
| | |
| <span style="font-size:medium"><span style="font-family:Verdana,Geneva,sans-serif">'''Farina:''' As you've already proven yourself quite keen in battle I might have another adventure for you to tackle. Wanna know more?</span></span>
| |
| | |
| <span style="font-size:medium"><span style="font-family:Verdana,Geneva,sans-serif">'''Player:''' Yes</span></span>
| |
| | |
| <span style="font-size:medium"><span style="font-family:Verdana,Geneva,sans-serif">'''Farina:''' This one could prove very difficult though, and I recommend that you bring as many brave adventurers as you can possibly find. ...</span></span>
| |
| | |
| <span style="font-size:medium"><span style="font-family:Verdana,Geneva,sans-serif">'''Farina:''' I over heard rumours that corruption and darkness is creeping upon our world, and just last week I decided to venture out to take a look for myself ...</span></span>
| |
| | |
| <span style="font-size:medium"><span style="font-family:Verdana,Geneva,sans-serif">'''Farina:''' And by all that is holy, I stumbled accross what certainly seemed like pure darkness echoing fear and terror coming from Fibula ...</span></span>
| |
| | |
| <span style="font-size:medium"><span style="font-family:Verdana,Geneva,sans-serif">'''Farina:''' Please hurry before it spreads further, it may very well be the end to our world as we know it today. ...</span></span>
| |
| | |
| <span style="font-size:medium"><span style="font-family:Verdana,Geneva,sans-serif">'''Farina:''' Should you find any particular object that stands out, please return it to me and I will reward you, alright? ...</span></span>
| |
| | |
| <span style="font-size:medium"><span style="font-family:Verdana,Geneva,sans-serif">'''Player: '''Yes</span></span>
| |
| | |
| <span style="font-size:medium"><span style="font-family:Verdana,Geneva,sans-serif">'''Farina:''' Good, good! I will wait here for you. As i remember the Golden Key can be useful at Eremo Island !Be safe.</span></span>
| |
| | |
| <span style="font-size:medium"><span style="font-family:Verdana,Geneva,sans-serif">'''Player:''' Hi</span></span>
| |
| | |
| <span style="font-size:medium"><span style="font-family:Verdana,Geneva,sans-serif">'''Farina:''' Hello there lil'one, what you want?</span></span>
| |
| | |
| <span style="font-size:medium"><span style="font-family:Verdana,Geneva,sans-serif">'''Player: '''Third mission</span></span>
| |
| | |
| <span style="font-size:medium"><span style="font-family:Verdana,Geneva,sans-serif">'''Farina:''' Enough of talking ! Pure darkness echoing from fibula</span></span>
| |


